Showing posts with label backup. Show all posts

Wednesday, 12 October 2011

How To Disable Time Machine Local Backups (and Relinquish Space in the MobileBackups Folder)

This morning, after importing a bunch of RAW files from my Nikon camera, I was startled (once more) by the lack of responsiveness of my MacBook Pro running OS X Lion.

Since the update, in fact, I'm growing pretty disappointed with Lion. It never roared just like the good ole Snow Leopard. The Lion cub has only shyly purred and whined, so far.

One of the things that bothers me most is Spotlight performance. Assuming you noticed it, have you ever wondered what the mdworker process is doing when it jeopardizes your Mac resources? I have: staring impotently at the screen, listening to the spinning rust crackling, powerlessly witnessing how the operating system is waiting to complete who-knows-what.

This morning, I opened Lightroom, started importing some RAW files, and started working on them. Well, trying to work on them while Lion was performing its... "housekeeping".

Frustrated, I expressed my anger on Google+. A friend of mine, Joaquin, pointed out both the cause and a workaround of the new Lion's behaviour.

It turns out that Lion is performing periodic local backups that will be flushed upon your time machine disk when connected. Thinking about versions, aren't you? Anyway, that's also why the new /.MobileBackups folder into your OS X hard disk is eating up disk space. Never noticed purple and white snapshot lines in Lion's Time Machine user interface? White ones are local backups, purple ones are "regular"time machine backups on an external disk. Well, local backups are kept for 8 days and they'll be taken only if you've got enough space on your disk. However, if you, like me, manage huge quantities of big files (such as a camera RAW files), this feature can start eating up an enormous amount of space.

If you, like me, feel like turning off this amazing feature you can use the following command:

$ sudo tmutil disablelocal

Should you change your mind about it, you can always turn it on again using:

$ sudo tmutil enablelocal

These are just the kind of options that should be accessible in the user interface.

Hope this helps you.

Wednesday, 1 April 2009

Install Linux in your Dropbox account using VirtualBox

DropboxDropbox is a very popular online storage service which provides 2GB of free space to store all your files, and selectively share them with the public. What is really nice about Dropbox is that it provides tools which integrates with Windows, Linux and Mac OSX and makes uploading and downloading files to and from your Dropbox, and act as a conduit for backing up all your important files - a seamless affair.

LinuxHaxor has a nice writeup on how to use your free 2GB Dropbox account to install your choice of Linux distribution via Sun's VirtualBox. Make sure the Linux distribution you choose is less than 2GB in size when installed as you will be limited by the 2GB space on Dropbox.

The writeup walks one through the installation of Damn Small Linux on Dropbox using VirtualBox. Read the article.

Saturday, 17 January 2009

Backing up ZFS file systems

This is one of the good things ZFS has brought us. Backing up a file system is a ubiquitous problem, even in your home PC, if you're wise and care about your data. As many things in ZFS, due to the telescoping nature of this file system (using words of ZFS' father, Jeff Bonwick), backing up is tightly connected to other ZFS' concepts: in this case, snapshots and clones.

Snapshotting

ZFS lets the administrator perform inexpensive snapshots of a mounted filesystem. Snapshots are just what their name implies: a photo of a ZFS file system in a given point in time. Since that moment, the file system from which the snapshot was generated and the snapshot itself begin to branch and the space required by the snapshot will roughly be the space occupied by the differences between these two entities. If you delete a 1 GB file from a snapshotted filesystem, for example, the space accounted for that file will go in charge of the snapshot which, obviously, must keep track of it because that file existed when the snapshot was created. So far, so good (and easy). Creating snapshot is also incredibly easy: provided that you have a role with the required privileges you just issued the following command:

$ pfexec zfs snapshot zpool-name/filesystem-name@snapshot-name

Now you have a photo of the zpool-name/filesystem-name ZFS file system in a given point in time. You can check about its existence by issuing:

$ zfs list -t snapshot

which in this moment, in my machines, gives me:

$ zfs list -t snapshot
NAME USED AVAIL REFER MOUNTPOINT
rpool/export/home/enrico@20081231 71.3M - 14.9G -
[...]

This means that the ZFS file system which hosts my home directory has been snapshotted and there's a snapshot named 20081231.

Cloning

Cloning is pretty much like snapshotting with the difference that the result of the operation is another ZFS file system, obviously mounted in another mount point, which can be used like whichever file system. Like snapshots, the clone and the originating file system will begin to diverge and differences will begin to occupy space in the clone. The official ZFS administration documentation has detailed and complete information about this topic.

Backing up

This isn't really how documentation calls it: they just refer to it with ZFS send and receive operations. As seen, we've got a mean to snapshot a file system: there's no need to unmount a file system or run the risk of getting a set of inconsistent data because a modification occurred during the operation. This alone is worth switching to ZFS, in my opinion. Now there's more: a snapshot can be dumped (serialized) to a file with a simple command:

$ pfexec zfs send zpool-name/filesystem-name@snapshot-name > dump-file-name

This file contains the entire ZFS file system: files and all the rest of metadata. Everything. The good thing is that you can receive a ZFS file system just doing:

$ pfexec zfs receive another-zpool-name/another-filesystem-name <>

This operation creates the another-filesystem-name on pool another-zpool-name (it can even be the same zpool you generated the dump from) and a snapshot called snapshot-name will also be created. In the case of full dumps, the destination file system must not exist and will be created for you. Easy. Full back up with just two lines, a bit of patience and sufficient disk space.

There are the usual variations on the theme. You don't really need store the dump in a file, you could just pipe send into receive and do it in just one line with no need of extra storage for the dump file:

# zfs send zpool-name/filesystem-name@snapshot-name | zfs receive another-zpool-name/another-filesystem-name

And if you want to send it to another machine, no problems at all:

# zfs send zpool-name/filesystem-name@snapshot-name | ssh anothermachine zfs receive another-zpool-name/another-filesystem-name

Incredibly simple. ZFS is really revolutionary.

Incremental backups

ZFS, obviously, lets you do incremental send and receive with the -i option which lets you send the differences between one snapshot and another. These differences will be loaded and applied at the receiver side: in this case, obviously, the source snapshot must already exist. You start with a full send and then you go on with increments. It's the way I'm backing up our machines and it's fast, economic and reliable. A great reason to switch to ZFS, let alone Solaris.

Sunday, 5 November 2006

AptonCD - Create a backup of all the packages you have installed using apt-get

Consider this scenario... You are interested in installing GNU/Linux on your machine. Assuming you already have the latest version burned on to a CD, it is a simple affair of popping the CD into your CD drive and starting the instalation. But once the installation is done and finished, you will most certainly want to install additional software apart from the ones bundled with the CD. And if you are using a Debian based Linux distribution such as Ubuntu, you will be using the apt-get method. Over a period of time you would have installed a number of additional software including any packages satisfying their dependencies as well as upgraded some of the software to the most recent version.

The problem occurs when you decide to re-install Linux on your machine. You are forced to start all over again, downloading additional software using apt-get. Personally, I have re-installed Debian or a Debian based Linux distribution umpteen times on my machine. And each time I have wished there was a simple way of backing up the packages which I have previously downloaded and installed via apt-get.

A good samaritan has pointed out to a unique project named AptonCD which allows one to create a CD image (ISO) of all the packages downloaded via apt-get or even the packages in a given repository.

On Ubuntu for instance, you can install it using the command:
# sudo apt-get install aptoncd
Once it is installed, you will find a Gnome menu entry at the location System -> Administration -> AptonCD. Clicking on it opens a GUI which will aid in the creation of an ISO image of all the packages stored in the /var/cache/apt/archives directory and any other files which are needed. You can also run aptoncd from the command line to start the AptonCD program.

So how do you use the program ?

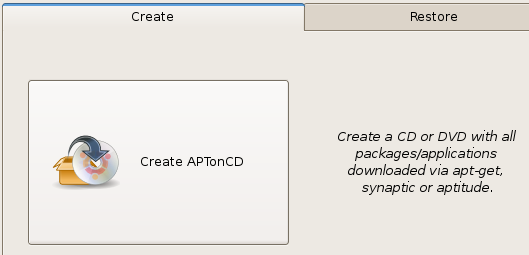
It is simple really, the GUI has two tabs namely Create and Restore. The Create tab has a single button which when clicked copies all the necessary packages from the /var/cache/ directory and displays it in a pop up dialog. Here you get to decide if you need to add any additional packages stored in an alternate location or remove some of the already selected packages. There is also an option to set the target media as a CD or DVD and the location where you want to save the resultant image.

Fig: The create tab has just a single button

Fig: Selectively include the packages using this dialog

Once the choices are made, the program creates the necessary CD/DVD image and saves it in the location you had chosen. Now you can either store it in a different location or burn it to a CD/DVD.

Fig: Restore tab allows you to restore from backup

The Restore tab of the AptonCD GUI contain three buttons each catering to a specific purpose. This tab allows you to -
  • Restore all packages available from an AptonCD media (read it as CD or DVD) on to the computer.
  • Restore packages from an AptonCD ISO image previously generated and stored locally.
  • Add a CD/DVD created as a repository for apt-get, aptitude or synaptic. Which means the program adds the necessary lines of code required in the /etc/apt/sources.list file which will enable you to use apt-get or any similar program to install the software on the CD.
I found this program really convenient to use not only when I re-install Ubuntu but also when I want to install the same set of programs on a different machine.

One thing it lacks is a way to automatically download the packages from a remote repository and create a CD/DVD image. But then this software is still in its beta stage and hopefully we can see more features built into it in coming years.

The AptonCD project is the brain child of Rafael who's first language (I believe) is Portuguese. Not surprisingly, I found the help files bundled with the project to require a bit more work as in the present form, they are just place holders for the required documentation. But he has done a remarkable job on the software itself and in its current form, it works flawlessly.